Thursday, June 20, 2013

Single & double

Good morning!
I had time and a little bit of energy left yesterday evening so I sat down by the desk and took care of a couple of already planned layouts. The first has three photos of my son sitting on the porch "reading" a magazine. In my pile of papers I had no news print paper but I found this vintage ephemera paper which I cut apart and layered behind the photo block. I used a darker blue cardstock piece as a foundation for the main block. I used up the last white color in my Uniball Signo pen *sob*. I got a smaller piece of that blue cardstock left and divided it to be the foundatin for two smaller clusters of embellishments. I decided on a green washi and some retro chip board I got from a pen friend a while ago. I added some smash sticky notes, enamel dots and acrylic paint splash in a couple of colors. I'm pleased with the result, I just love the photos!


Then I took out the photos from my daughter's dance recital in May and decided to make it a two-page layout. I used a green soft patterned paper and a paper called "Soiree" from House of Three, it has the text on one page and the green polka on pink on the other side. I added doilies, washi and paper flowers that I had misted with my Liquitex inks. I added doilies, washi and paper flowers that I had misted with my Liquitex inks. I found some bling clusters that I had recieved from a penfriend and I thought they fit the color scheme. In hindsight I wish I had cut apart the bling clusters and added them sticking out from my other embellishments clusters but that is too late now. I added Thickers as title, some journaling and last, but not least I drew frames in the empty white spaces.

Here is the left page:


And here is the right side:


Side by side they look like this! I'm sorry about the glare.


This week has not been as creative and/or productive as I was hoping. I don't feel very good about that but I haven't had much choice. Today is my last day at work before three weeks of summer vacation. Tomorrow is Midsummer Eve and the weather is... how shall I put it... soaking wet and then some! It is unfortunate ofcourse and I feel sorry for the kids at day care who were going to celebrate there and had already picked flowers for the midsummer pole and wreaths yesterday. Hopefully it will get better after lunch.

I hope I'll be able to scrapbook some during the vacation evenings we spend at home and I will update here as soon as I have something to show you! Have a wonderful Midsummer and may the lovely weather be with us all!

Hugs!
//Åsa

Monday, June 17, 2013

Weekend layouts


Good morning and Happy New Week! Only four working days before summer vacation and Midsummer celebration! Midsummer celebration is BIG in Sweden, in my opinion it is the best holiday of the whole year and this year we have so much flowers it will be lovely! Perhaps we can make our own midsummer pole and dance with the kids! That would be just great!

Today I have two new layouts to show you. The weekend was not what I was hoping for scrapbookin'wise. We had some problems with bedtime with the kids and it took soooo long time! When I finally came to my desk (both on Saturday and yesterday) I had no inspiration left at all and I went to bed rather quickly. Anyway, I managed to turn the backgrounds I made last week into layouts and I'm pretty pleased with both of them.

This first layout with an old 2009 photo of my daughter is on a background made of papers from the Take Note collection from Doodlebug. I have the 6x6'' paper pad and I decided the size of my paper pieces so that the clip pads would come out whole. When I had glued all the small pieces down I showed it to my hubby and he thought it was pretty and asked if I were going to cut it up into pieces :) 

With all the colors and patterns going on I thought it was important not to clutter the whole thing with embellishments so I decided to keep it simple. I made a washi banner and added some washi in the corners. I had to add the black cardstock for the photo to "stand on" otherwise the photo would have floated around in space and it didn't look good at all. The banner turned out fine and I will use that technique soon again!


 My next layout has a background made from my 6x6'' "He said she said" paper pad from Teresa Collins. Here I choose the size of my pieces from the size of the tiny journaling cards in the pack. Then I took out my bag of vintage bits and pieces and made a layering pile, as if the multitude of different patterns weren't enough :). But if you knew the lady in the photo you would know that there could never be too much of anything. I was a bit worried since I mixed the white based collection with cream vintage papers but I went with my gut feeling and I'm pleased with the result. The lady is my grandmother. She passed away in 2008 at the age of 86. This photo was taken when I was a kid. In the journaling I've written about the various things I learnt from her for example peeling shrimps and playing cards.  


 Hopefully I'll be able to scrapbook during this week. Next week we're going on a trip and I will be working on photographing instead of scrapping, but it is fun as well.

Take care and have a great day!
// Åsa


Thursday, June 13, 2013

I love paper

Goodmorning!
Yesterday evening I managed to finish two layouts and to make two backgrounds and I feel I'm getting back to my "happy scrappin' place" after a couple of days with performance anxiety. Not anything near a scrapping block but enough to have me fall asleep on the sofa instead of even trying to scrapbook.

I took one of my home made kits and got started. I've tried not to make monochromatic layouts all the time but I always seem to come back to that and here I ended up in a white=>red color scheme which followed the colors in the photos of my daughter really well. Monochromatic is right in my comfort zone.

I used my new small doilies and I think those were just the right size for me and I like the cute effect they give. What a lovely embellishment for such a tiny price! I made a classic design with three clusters and a heavy title at the bottom, it seems to work for my multi photo layouts and I like it. It only bothers me that I seem to get stuck in that type of layouts and I'd prefer if I could vary my style more. 


I know I said I was done with multi photo layouts for a while but I seem unable to stick to that. These are photos from my daughter's last session for the semester at swim school. Just the other day I found a package with those small bluish epoxy rectangles in my stash and I thought it would be super fun to use them with these photos. I added some of my new bling and I some wood veneer arrows to point out my little girl in the group. The title says "swimschool" and the Swedish abbrevation for "spring semester-13". I spelled it with raw chipboard letters from my old Heidi Swapp stash and then I covered the letters with glitter glue.


Now in hindsight I think I should have matted the photos (perhaps with white or teal) before attatching them to the dotted paper but I didn't so I'll have to live with this.

When I had done these two I sat down and cut papers from two of my 6x6 paper pads into squares and rectangles and then I glued them onto white cardstock to form kind of a quilt of patterned paper, a grid with different patterns but from the same collection. It was hard to get the pieces to fit, my paper trimmer isn't very straight when it comes to this kind of accuracy but I managed to get two really fun looking backgrounds which I will use when I sit down to scrapbook next time. I will have to force myself to only use one photo for each of these projects because I don't want to cover up the pretty backgrounds too much. I want to start now!!

Have a lovely day! Hugs!
//Åsa


Tuesday, June 11, 2013

Following rules

Good morning!
Last night I decided to go through my paper stack and try and find paper that fit together. When I found a pair or a bunch that matched I put them together in page protectors. One of my scrapbooking idols, nicolejones911 on YouTube, said she used to do that when she got a new kit and I thought it was a good idea to get a start and not forget about a nice paper that I want to use. I have a pack of page protectors that I only use for planned layouts, it was a purchase long ago that was wrong, the page protectors are for ring binders and I use post bound, but I'm happy I have them and I use them alot.

I used to plan layouts starting with my photos and then adding to it but I have changed that totally. Now I choose paper and then I add photos after that.

I filled all my page protectors with nice combinations and then I choose one to work with. The background paper is an ancient one from Basic Grey, it has a lot of things going on but the colors are really soft. To spice it up some I combined it with the Marvelous Madeline paper from American Crafts' My Girl collection. It has the speech bubbles on one side and the pink chevrony print on the other side. I used up half of that paper for this layout and I'm already looking forward to using the rest of it for another layout, the colors are just darling sweet.

I placed the speechbubbles and my small blocks of chevron around the large photo of myself and then I added a couple of small bits and pieces from my new home made stash. Some got a little color from ProMarkers but not much, I liked the white. Some wood veneers, journaling and an acrylic alpha title and some mini alpha stickers added the finishing touch.


Lately I've been kind of obsessed with "the rule of three" and placing embellishment clusters in a visual triangle over the page. I guess you try to hold on to the few design principles you know. So I was a bit troubled that I got more like four groups or embellishments on this page but I finally decided to relax and just go with the flow. To the delight of my OCD-part of the brain i saw that I actually got kind of an odd arrow effect towards the left and my journaling with my eyes in the middle. Iäm pleased with that. The title says "It will be alright" and the journaling is about my wish to sometimes see into the future just to be able to let go and trust that everything is going to be alright. 

Have a nice day!
//Åsa  

Monday, June 10, 2013

Stamped elements

Good Monday!
During the weekend there has been a really interesting topic up for discussion over at the forum at Two Peas. It has been about getting the effect and style that Glitter Girl has without spending a fortune on elements and premade bits and pieces. The discussion has collected a wonderful list of tips and suggestions and the topic is really dear to me since I like to have lots to choose from but my budget is kind of pushing my money in the direction of paper instead of printed paper embellishments. When I get my hands on a pack like those bits from Amy Tangerine it is a special & rare occasion. But just like alot of other scrappers I like the look with lots of things going on. So, what to do? I loved all the suggestions that came up in the thread and I got alot of inspiration from that and I started thinking of the things I had and the things I wanted to have and suddenly I realized that this is the perfect opportunity to use some of all my wonderful stamps which I sadly seldom use (mainly due to pure old laziness).

I went through my stash of stamps and looked for the ones I thought looked fairly current and that could be used as elements for embellishment and/or layering. I also looked for those that could be colored. I took out my stamping paper that I use when I stamp and color for card making and I stamped with my Staz On, it is the ink pad I think works best for clear stamps. Then I stamped like a mad woman and after a couple of packed pages I sat down in front of You Tube and watched haul and process videos the whole evening while fuzzy cutting out all the elements I had stamped. This is the pile I had on my desk when it was time for bed and I feel so inspired about all this! I will color these darlings with my ProMarkers when I'm about to use them and I hope it will be a nice addition to my stash of elements.  


I hope you'll have a nice Monday! Hugs!
//Åsa

Sunday, June 9, 2013

More tags and cards

Hi again! It was a lot of fun to use those labels I made the other day and I thought perhaps you'd like to see another pdf I've made. It has labels like these and are alot more colorful than the one I posted yesterday.


You can down load it HERE if you want to take a closer look and perhaps even print it and use it in your layering!

//Åsa

My first two

Good morning! The kids had a sleep over at their grandparents yesterday and now it is before breakfast and we haven't fetched them yet so that is why I'm up with a new post eventhough it is weekend! Other people might go out to a movie and a fancy restaurant when they have the kids at the grandparents but we spread out our crafting supplies over half the house, stayed up until 2 am and loved the fact we could leave everything out until morning. Yeah, you know you are a carfting nerd when...

Anyway, I havenow opened all the embellishment packages and found suitable storage for everything I bought. I have set up all the things I need to start the next "50 layouts" challenge. It feels like I'm getting ready for a crop or something but I'm just making sure I have all the possible inspiration at hand!

On Friday I managed to find time for some paint splash making and I'm very pleased with the colors and the small bottles! I might need to get some more of those so that I can have my black and white in the same type of bottles.


So last night I started take two on the Facebook challenge to create 50 layouts before shopping. So this is my layout #2.1 and I'm so pleased I don't really know where to start! I just love the Amy Tangerine bits! They will not last long in my stash! The little people wood veneers are just darlig cute and I'm so hapy I finally found some, they have been out of stock like forever and here in Sweden I have never seen them for sale before. I was so happy to find them just in time for my "embellishment replenishment"! It was super fun to start using my new papers and I'm in love with the water color effect on the patterned paper! I tried out my new home made splashes for the first time and I'm so pleased with the result! I will use those a lot! This layout is about our morning routine at the moment. The photos are from just a couple of weeks ago and we are on our way to day care in the morning.


The next layout, #2.2 is also with very recent photos. We celebrated the first really warm summer evening a couple fo weeks ago by having a huge family water gun battle in the garden. It was so fun, I laughed so much and we got soaking wet all four of us. I had planned this page in a page protector and choosen the patterned papers and I liked the combination of that ancient old paper as a mat and this new wood grain print from Studio Calico as the "main event" on the page. But when the page came together I noticed that the wood grain was covered up alot and I thought that was sad so I went to my stash and tried to find a replacement. Ofcourse I couldn't find one, you can't just really replace perfection, can you? So I ended up using it anyway, but I cut out all the paper behind the photo block so that I'll be able to use the wood grain some more! I thought that was the best thing to do, almost like eating the cookie and having some left at the same time! Here I used some of the labels I shared with you yesterday and I'm really happy I made them! I also used some free printables that I found online (the orange camera and Oh shoot circles). The yellow dots are leftovers from the yellow alpha chipboard set and I splashed some black paint over the diagonal clusters for some extra interest. I'm really happy about this layout and about the memory itself!
 

I hope you'll have a wonderful Sunday and that it will be a sun-day for all of us! Take care and come back soon!
//Åsa

Saturday, June 8, 2013

Tags on white and cream

Hello!
Today I'm sharing a pdf with tags that I have made myself. I will use them for layering and I hope that it will be a nice addition to my stash of bits and pieces for layering!

HERE

Feel free to use it any way you like!
Take care! Hugs!
//Åsa

Thursday, June 6, 2013

The paper stacks!

Hello again!
I jsut wanted to show you the papers I'll be working with from now on before I start ctting into them. This first photo shows the papers I bought in early May. Those are fairly new and modern.
 

But I also need to scrap my stash so I went through my paper folders looking for papers that could be used for layering, backgrounds etc. and I found this collection. Some of these papers are 7-8 years old and it is time to use them!

  
Next time I blog I'll hopefully have a new layout to show you! Can't wait to start using all my new stuff!
//Åsa

My scrap space!

Hello! When you have a scrapbooking blog I guess it is appropriate at some point to show where you do your paper crafting and I think I have come to that point now. I don't have a scrapbooking room and I don't think I would have wanted one if I could have one because I love my space so much and it gives me the possibility to spend time with my hubby when we are doing our different crafts and hobbies. 

Our living room is L-shaped. The part of the L closest to the kitchen is our dining area and the part closest to our hallway is our computer & crafting area. We have the TV and the sofa in the corner of the L. When we were planning our home before we moved in we thought of having the habby area in the basement because that is how people normally have it and we kind of thought we had to do it like everybody else. But the more we thought about it the more crazy it sounded. Our crafts are a huge part of our lives and our goal is to be able to incorprate it into our daily life as much as possible and if we need to go to the basement to craft that would feel really backwards. 

So we decided to make a crafting area and this is what we came up with. Everything is IKEA. Hubby has the desk to the right and mine is the one next to the cabinet where I have all my scrapbooking supplies. We have one stationary computer each and a printer in the middle. When we need to spread out stuff and have more room we use the table by the window and it can double in length if we'd like. This is a great place for the kids' crafting too and we sit here alot with them even when we play games and sometimes we eat here too when it is too sunny in the dining area. Above the desks we have a long shelf where we can put away things that we like to have close.


This is my cabinet. It is the best piece of furniture I've ever bought! On top of the cabinet is my Cuttlebug and my green box of supplies for it. I have my box of recently printed photos and my tool bag there too. On my tool bag you can see my collection of washi tapes on a metal ring. The black box has cords, chargers and such electronic stuff that needs to be stored away because you don't use it every day. On top of the black box are the new toners for the printer.
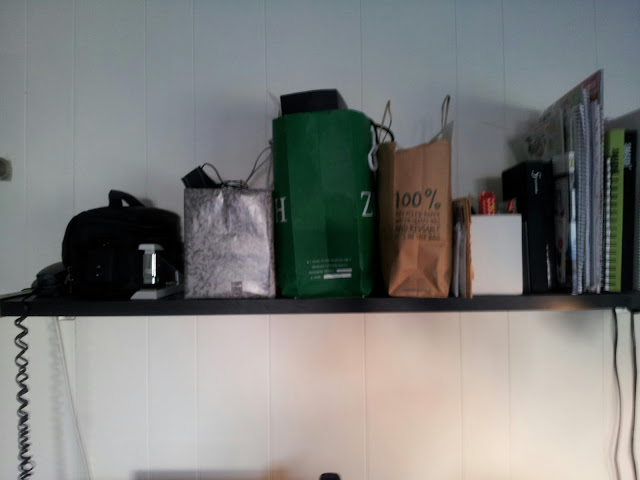
On my part of the shelf I keep my camera bag, a box with cords and chargers etc that I use almost daily, my green bag with supplies I use alot and my brown bag with my goodies that arrived this week! Some pens and some letters to the right.


The upper part of the cabinet has three shelves. I store everything in boxes, bags and folders so that I can easily take them out and go through them and easily put them back again. On the upper shelf I have stamps, paints, my beauty bag (which stores all the tools and supplies that I use every time I scrap, such as scissors, glue, foam tape, acrylic block, journaling pens etc.). To the right is my box of paper flowers sorted by color in empty spice jars. 

The middle shelf has my tiny collectio of Thicker to the left, a box filled with ribbon, dies for my QK, Promarker pens, ink pads and my QK hand tool and more dies.

On the bottom shelf I have my layouts that are waiting to movie in to albums to the left. After that comes my 6x6 paper pads and my box of journaling cards. Behind these boxes are my photo storage where I keep photos that doesn't inspire me at the moment. Under the box of journaling cards are two boxes, one with stamped images and one with stamped & colored images for my cardmaking. Then to the right I have three folders with 12x12 papers (two with patterned paper and one with cardstock). Between the folders I have several page protectors filled with scraps. To the right I have bags and page protectors with themed papers such as Christmas and Halloween.


Behind the screen I store my finished greeting cards in that red box. On top of that I have a box with paper flowers the bulky kind, in the black bags I have clear stamps and cardstock scraps. On this shelf I also store my pen palling stuff, my address box and my 12x12 white papers.


In the upper drawer I store mbellishments. Here you find everything from stickers and rub ons to lace and stick pins. Here is also my paper trimmer.


In the bottom drawer I store my chipboard shapes & alphas, zip lock bags, memorabilia,  empty jars and foam stamps.
 

Here is a look into the green bag on the shelf over the desk. I store my embellishments in glass jars or in the package Ibought them in. The little black bag has clearstamps that I feel inspired by at the moment. The black bag fits in the green bag.


Here is my new bag of goodies! Here are also my new paper copies! Everything new for my next 50 layout challenge! I will soon take it out and incorporate it into my green bag!


Thanks for stopping by! Hugs!
// Åsa


My embellishment haul!

Hello! Wanna see what I got in the mail?!? Here is my embellishment haul for my mid-challenge replenishment! 

First I have a order from Pysseltagen, a Swedish webshop that I like alot. They have a rather large variation and I like the things they carry. I'll start with some tools. I bought three rolls of 9 mm double sided adhesive, each roll is 30 meter. The price was really good, like US$ 2 for 100 feet of tape. I bought three fluid chalks, the brown that I use all the time. I like these from Prima but I don't like that they crumble when you've used them for a while. They still have chalk left but the pads wear out and you get small bits and pieces of the pad everywhere on your project if you're not careful. I also bought five small bottles that I plan to use for my home made acrylic paint splash. The ones I use now have a metal lid and they get stuck all the time and I don't like that.


My goal was to buy five or six Paper Pens from Viva Decor in different colors and use instead of enamel dots but Pysseltagen didn't have all the colors I was interested in. I bought yellow, green and blue. They had Smooch on sale so I bought the silver glitter one and an aqua colored Stickles. I found binder rings for a really good price and I think I'll use them for keeping together embellishment bags. The little jar with white lid holds a multitude of green and blue bling stones.


Since I couldn't find all the paper pens I wanted I bought some inexpensive adhesive half pearls in easy to use colors.


Last I bought foam squares, white doilies, sticky notes and some brads.
 

My second order was from Sirap i Paris which is one of my favorite Swedish web shops since their stock is unusually up to date for being Swedish. They had just gotten in the wood veneers from Studio Calico again and I ordered as soon as I saw it. I have yet another package of the little potty people coming in the mail next week, she had forgot to put in two as I had ordered. I also ordered the Amy Tangerine Bits. They'll be fun to use with layering! 


I'm thinking of ordering something digital, like journaling cards or smaller cut out elements (tags, labels, shapes etc). For National Scrapbooking Day I used the free printables they had for the challenge at Two Peas in a Bucket and I loved those! I'm going to look for freebies and if I don't find any that I like I might try and buy some from Two Peas or American Crafts. I have not done that before. Can you give me any tips?

Happy Swedish National Day!
Hugs from Asa

Wednesday, June 5, 2013

Grand Finale!

Hello!
Have you missed me? I have certainly missed you! I've not updated since Thursday and that is almost a week ago! I have been using my free time and my slow time at work for letter writing this week and I've managed to write three long letters so I'm happy with that. Yeah, I am a pen pal and I've been one for 25 years now so that is also important to me. But now I needed to do some scrapbooking especially since I was sooo close to the goal of 50 layouts! 

First I want to show you what I did with those layouts that I made last week that didn't feel ready. This is #46 and it had a nasty empty space above the "j" in the title and I fixed that by adding a sticker on foam tape and it made alot of difference.


Here is #47. I added soem washi and text stickers to bring out more of the red tones and to make a diagonal path for the eye over the page.


This background paper from Hot off the Press and this wonderful photo of me and my son have been stuck together in a page protector in my cabinet for a very long time and I can't even remember what I had planned when I first put them together. Now I felt I needed to get it done and I started looking at the combination and searching for special things to emphazise. The thing that I kept coming back to was the blue in our eyes and in my son's sweater. I decided it was time for some embroidering and I took out blue thread, drew the word Love with pencil, pierced holes along the line and started sewing. It took some time but alot less than I had expected before I started. I added text stickers to form a border to the right and that is it. This is #48.


Next project is a 3-page layout. I will count it as one project because it is really not scrapbooking. I haven't added one single embellishment, no patterned papers or anything really it is just 16 photos that desperately needed to get into our album. I took these in our apartment when we just had bought our house and the apartment was out for sale, back in 2010.


And now...*drum roll*...No.50!!! The two photos are from fall 2012 and I've used a background paper and a large titel card from Simple Stories Harvest Lane collection. I also added lots of journaling cards from my stash, fabric labels, a flair, felt flowers and enamel dots.


Yeah! I have finished the challenge! So what happens now? I'll replenish my stash of current embellishment and then start all over again! I will bring out the papers I bought earlier in May, I will spend about 750 SEK (about US $100) on embellishments (no papers) and then make 50 more layouts. Do I need to spend that much money to do 50 more layouts? No. Do I want to? Yes.

In my next post I will show you what I have bought and then it's scrappin' time again!!

Tomorrow it's National Day in Sweden so we are off from work. We are hoping for nice weather so we can be out doors. Take care and see you soon!

//Åsa